Add variables
In addition to Harness' many built-in variable expressions, you can add custom variables at the account, org, and project scopes, as well as within individual pipelines.
Account, org, and project variables store values that you can share and use across multiple pipelines in multiple projects.
Pipeline variables include variables added within an individual pipeline and limited to the context of that pipeline.
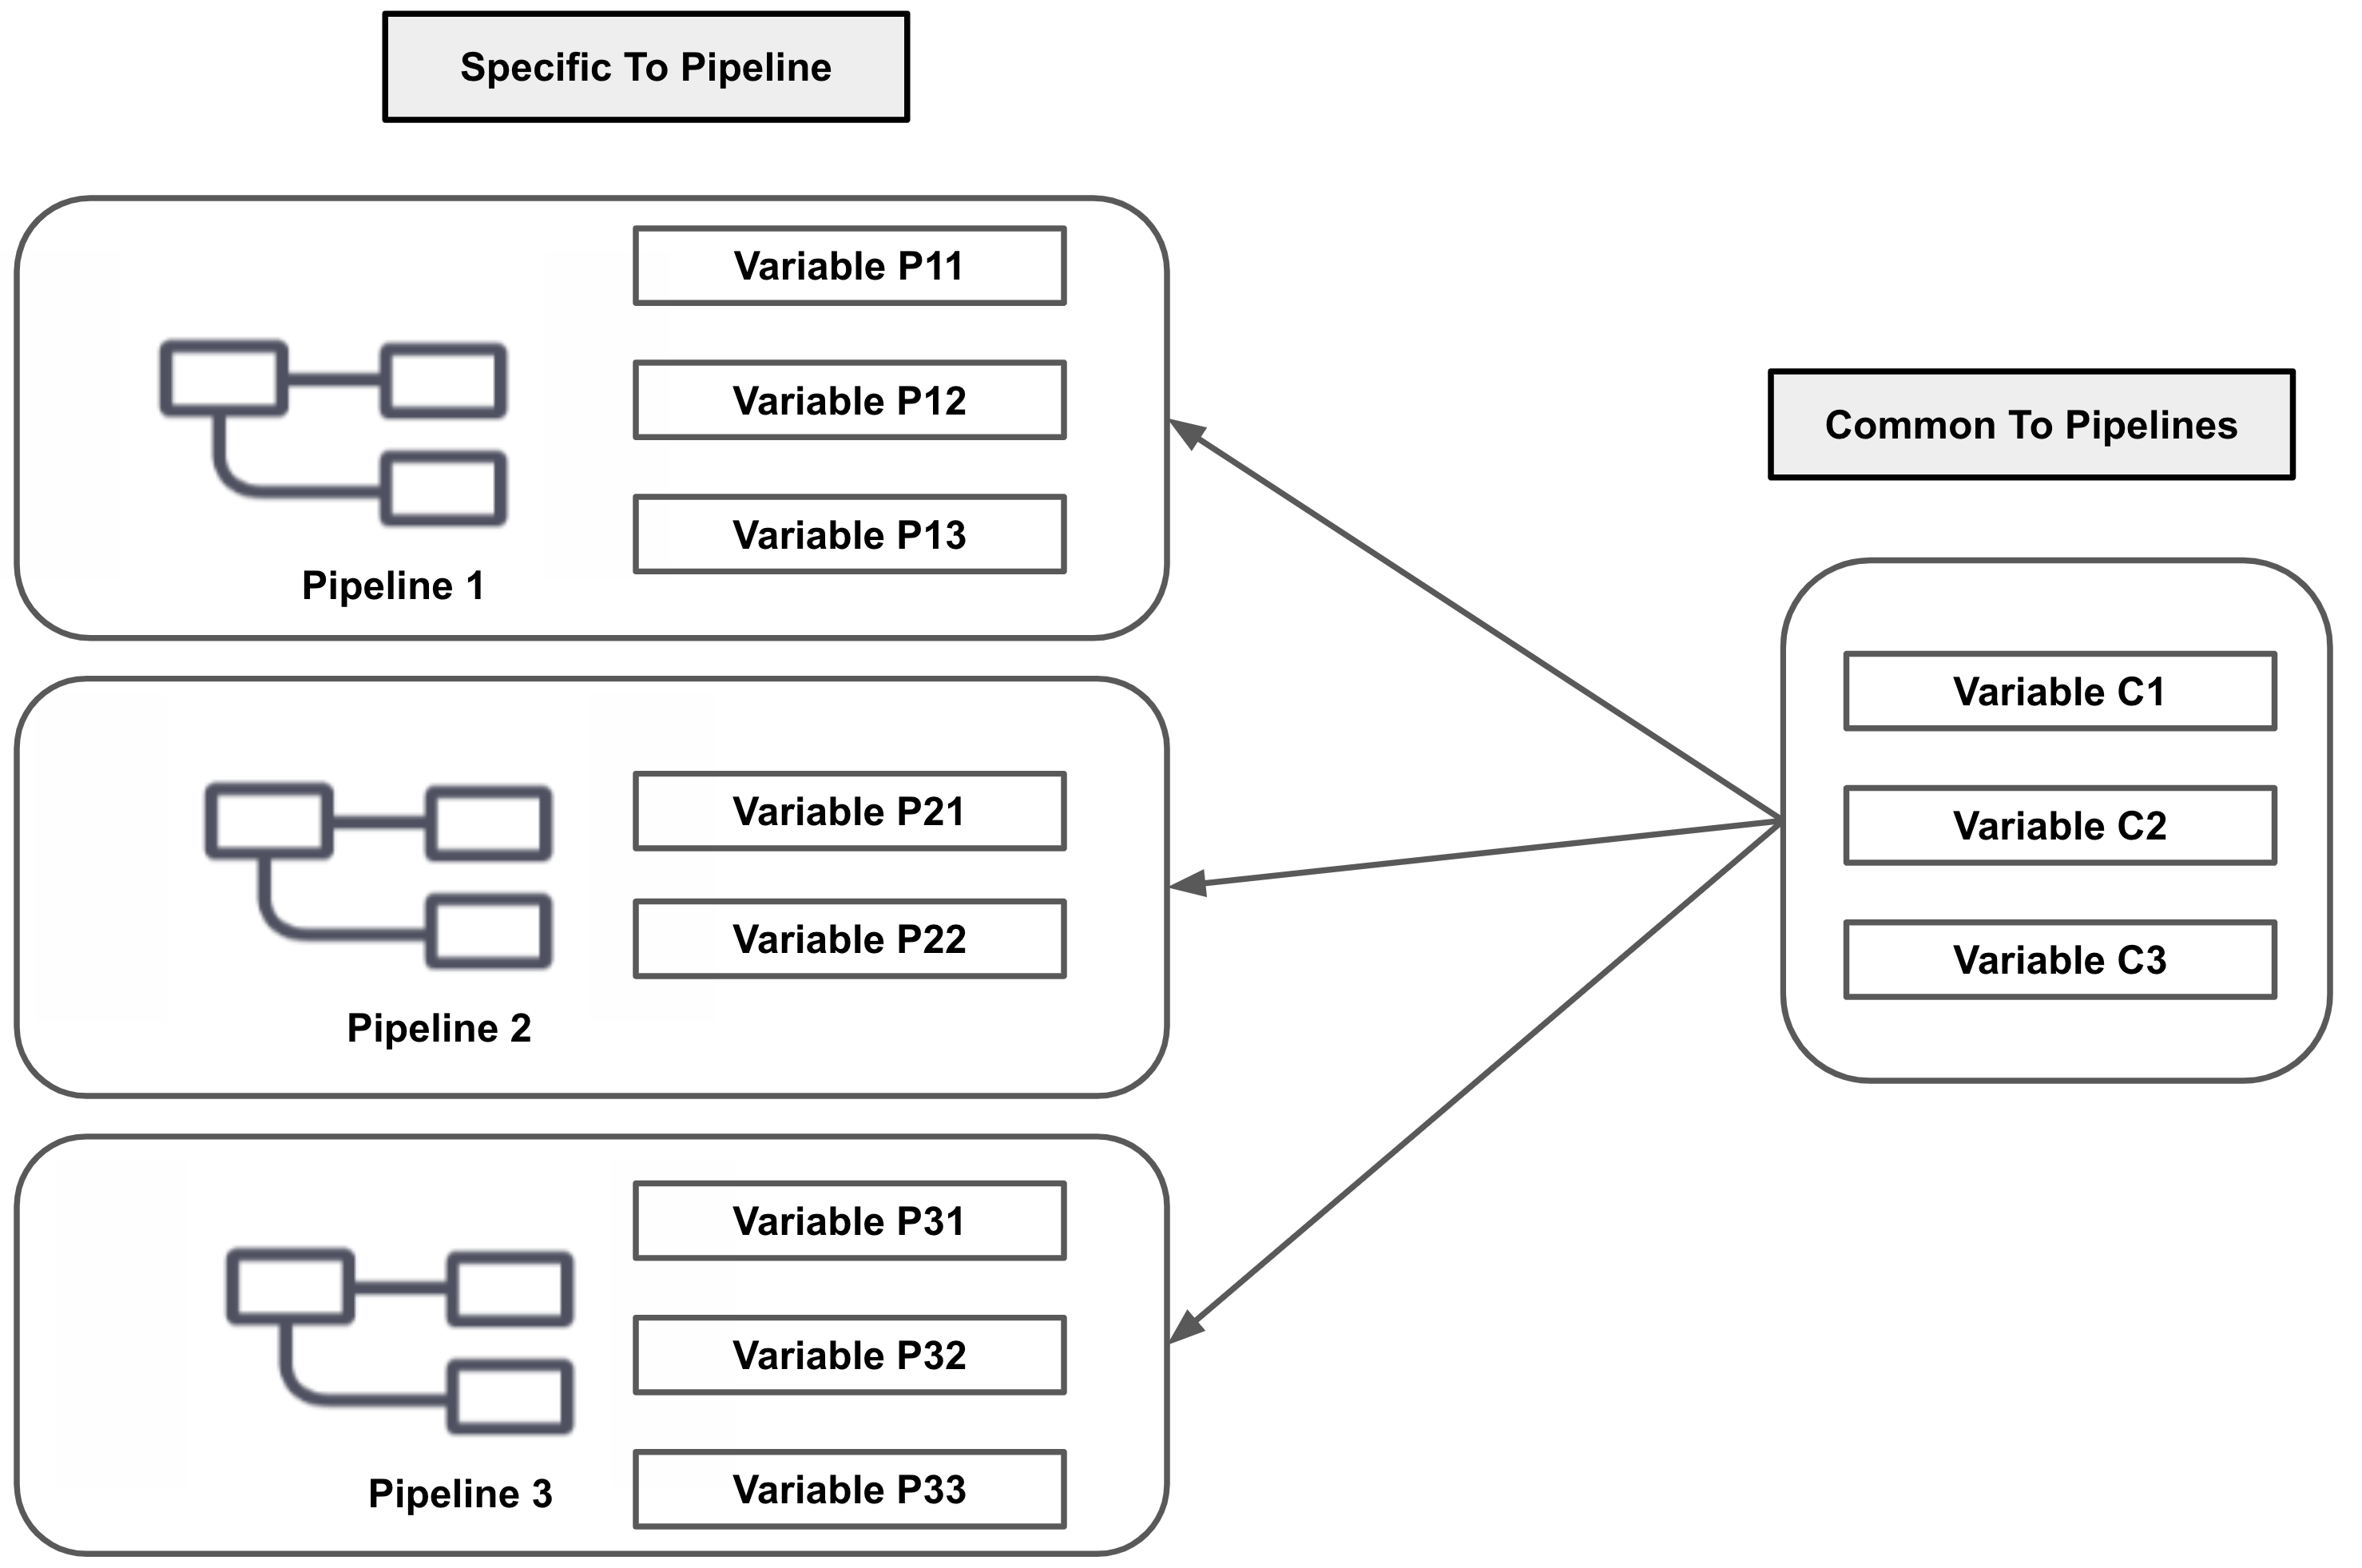
Variable scope diagram
This diagram illustrates the availability of variables based on their scope.
The Common To Pipelines variables represent account-, org-, or project-level variables. The Specific to Pipeline variables are pipeline-level variables.
This topic explains how to add and reference variables in Harness. It assumes you are familiar with Harness' key concepts. To manage variables, you need permissions to view, create/edit, and delete variables.
Variable parameters
- Variables can be of type String, Secret, or Number.
- Variable values can be fixed values, runtime inputs, or expressions.
- However, account, org, and project variables support fixed values only.
- Variables created at lower levels (such as pipeline, stage, and service variables) support fixed values, runtime inputs, and expressions.
- You can reference secrets in pipeline, stage, and service variables.
- If you delete a variable that is referenced by expressions in your pipelines, those expressions are not deleted.
- At runtime, when Harness attempts to resolve the expressions, the expression will resolve as null, and the pipeline can fail if null is an invalid value.
- After deleting a variable, you must manually check for and remove expressions referencing deleted variables.
- If a variable is assigned a date value in the format
2002-12-14, the YAML converter adheres to the YAML convention by converting it into a datetime object. For more information, go to the YAML specification for tags. - Some variables can be flagged as required.
- The Required setting is supported for pipeline, stage, service, and environment variables.
- The Required options is also enforced when the variable is defined in a template and the template is included in a pipeline.
Pipelines won't run if the default value of variables start with *. You can use * within " " as a workaround.
Variable availability to pipelines, stages, services, and environments
Account, org, and project variables are available to all lower scopes. For example, an org variable is available to all projects and pipelines under that org.
Variables added to pipelines and stages are available to all stages in the pipeline.
Variables added to services and environments are available in all stages that use those services and environments. For more information, check out the Harness pipeline, stage, and service variables overview video.
You can override service variables at the environment level. For more information, go to Overriding services at the environment level.
Add variables
- Account scope
- Organization scope
- Project scope
- Pipeline variables
-
In Harness, select Account Settings.
-
Select Account Resources, and then select Variables.
-
Select New Variable. The Add Variable settings appear.

-
Enter a Name for your variable.
-
In Fixed Value, enter a value for your variable.
-
Select Save.

-
Select Account Settings.
-
Select Organizations.
-
Select an org.
-
In Organization Resources, select Variables.

-
Select New Variable.
-
Enter a name, select the variable type, and then enter a value.
-
For example, here's a variable named
organize_var.
-
Note the Id. That Id is used to reference the variable.
-
Select Save.
At the project scope, you can use API or the Harness Platform to create variables.
- API
- Harness Manager
Use the createVariable API to create a new variable.
Here's an example:
curl -i -X POST \
  'https://app.harness.io/ng/api/variables?accountIdentifier=H5W8iol5TNWc4G9h5A2MXg' \
  -H 'Content-Type: application/json' \
  -H 'x-api-key: HARNESS_API_KEY' \
  -d '{
    "variable": {
      "identifier": "myvar123",
      "name": "myvar123",
      "description": "testvar",
      "orgIdentifier": "default",
      "projectIdentifier": "CD_Docs",
      "type": "String",
      "spec": {
        "valueType": "FIXED",
        "fixedValue": "bar"
      }
    }
  }'
-
In a Harness Project, select Project Setup, and then select Variables.
-
Select New Variable.
-
Enter a name, select the variable type, and then enter a value.
-
For example, here's a variable named
proj_var.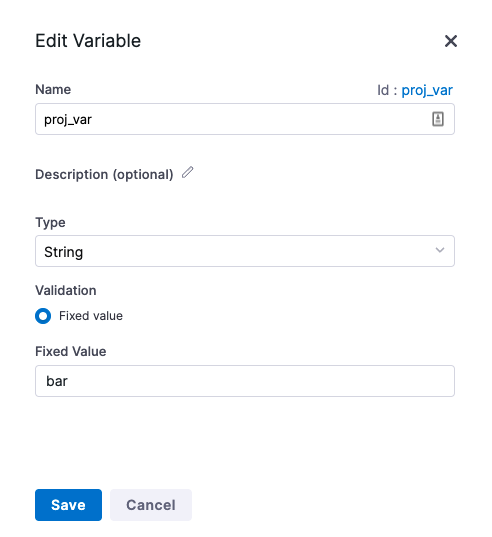
-
Note the Id. That Id is used to reference the variable.
-
Select Save.
To create variables at the pipeline or stage level, go to the pipeline where you want to add the variable, and then use one of the following options to add variables:
- Select Variables on the right side of the pipeline studio to add pipeline or stage variables.
- Select a specific stage, select the Overview tab, and add stage variables in the Advanced section.
- Add variables in the YAML editor. The indentation determines whether the variable is a pipeline or stage variable. For stage variables, indent
variablesunder- stage, aligned withstage.spec. For pipeline variables, indentvariablesunderpipeline, aligned withpipeline.properties.
  variables:
    - name: sourceToken
      type: Secret
      description: Access token for the source repo.
      required: true
      value: <+input>
Some steps support step-level environment variables or output variables. Usage for these options is described in the documentation for those step types.
Reference variables in a pipeline
To reference an account and org-level variable, you must use the following expression in your Pipeline:
<+variable.SCOPE.VARIABLE_ID>
- Account-level reference:
<+variable.account.VARIABLE_ID> - Org-level reference:
<+variable.org.VARIABLE_ID> - Project-level reference:
<+variable.VARIABLE_ID> - Pipeline-level reference:
<+pipeline.variables.VARIABLE_ID> - Stage-level reference:
<+stage.variables.VARIABLE_ID> - StepGroup-level reference:
<+stepGroup.variables.VARIABLE_ID> - Service-level reference:
<+serviceVariables.VARIABLE_ID> - Environment-level reference:
<+env.variables.VARIABLE_ID>
The expression to reference Project scope variables is <+variable.VARIABLE_ID>. You do not need to specify scope to reference project variables.
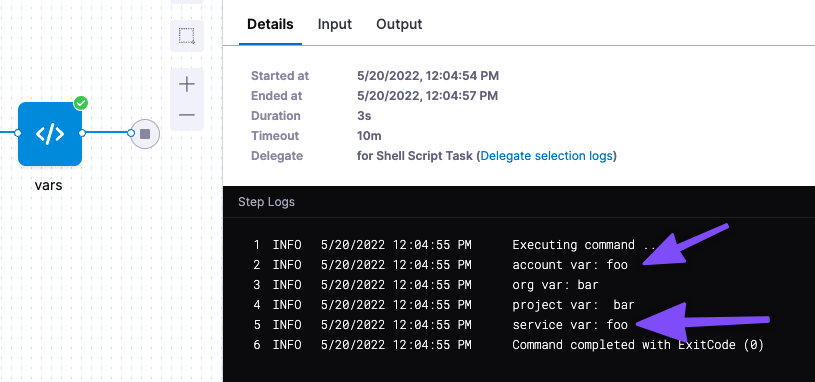
Let's add the variable in a pipeline:
- In Harness, go to a pipeline in the same org as the variable you created.
- In a stage Execution section, add a Shell Script step and reference the variables:
echo "account var: "<+variable.account.acct_var>
echo "org var: "<+variable.org.organiz_var>
echo "project var: " <+variable.proj_var>
echo "pipeline var: " <+pipeline.variables.pipeline_var>
echo "stage var: " <+stage.variables.stage_var>
echo "step-group var: " <+stepGroup.variables.stepGroup_var>
echo "service var: " <+serviceVariables.service_var>
echo "environment var: " <+env.variables.env_var>
When you run the Pipeline, the variable references are resolved and output:

Use an account, org, or project variable in a service variable
-
In Service, in Advanced, select Add Variable.

-
The Add Variable settings appear.
-
In Variable Name, enter a name for your variable.
-
Select String as Type and select Save.
-
Your variable is now listed under Variables.
-
In Value, select Expression and enter
<+variable.account.acct_var>.
-
Now, when you run your pipeline the referenced value is evaluated at runtime.
-
In your pipeline stage, copy the service variable from the Variables panel:

-
In your Shell Script step, reference the service variable with:
<+stage.spec.serviceConfig.serviceDefinition.spec.variables.serv_var> -
Run the pipeline and see that the value for the account variable is passed into the service variable:
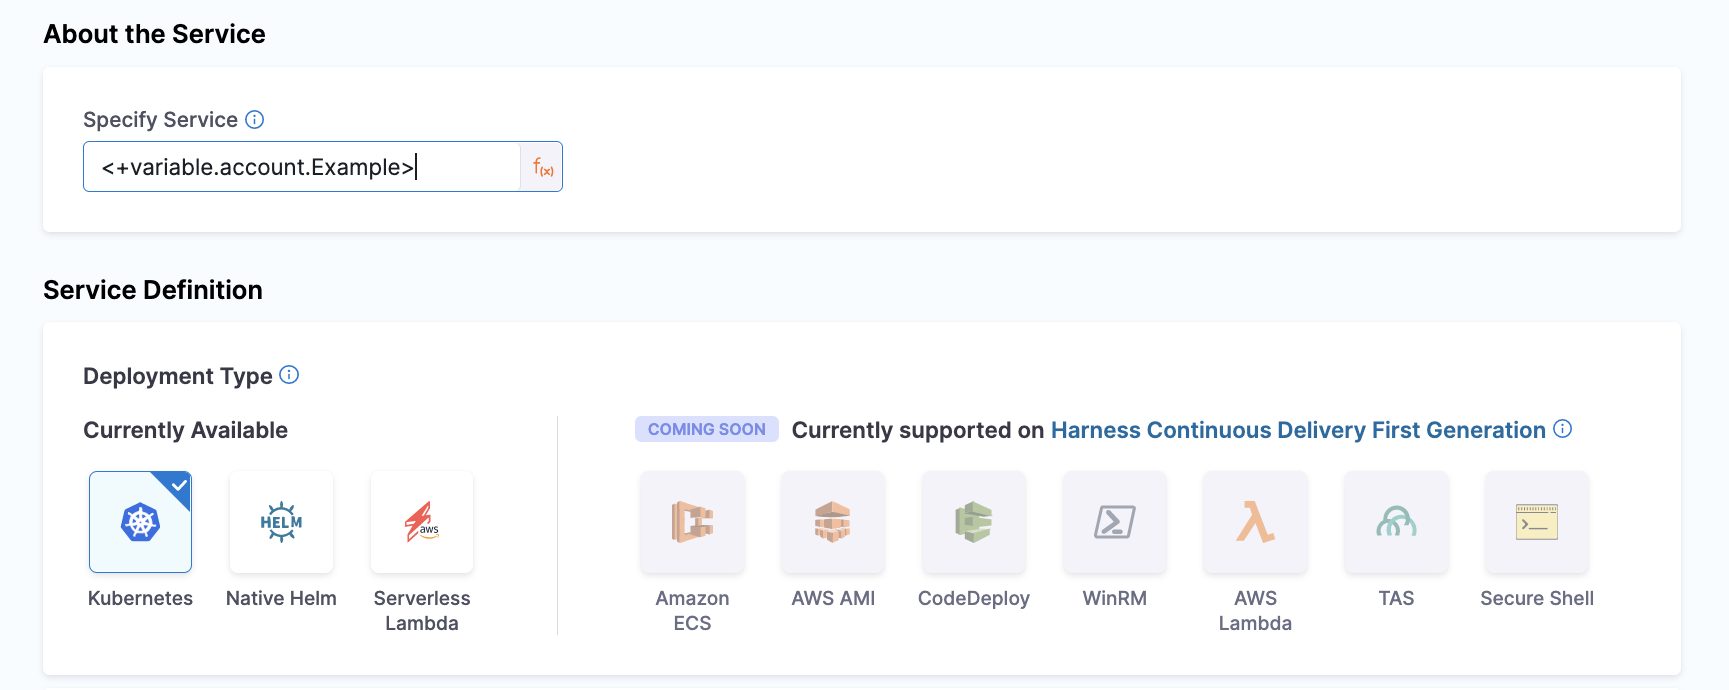
You can refer to a variable in most settings. For example, if you have an account variable storing a service named Example, you can refer to it inline using the same expression.
Now, when you run your pipeline the referenced value is evaluated at runtime.
Export service variables as environment variables in a Shell Script step
You can use the Export Service Variables as Env Variables setting to export service variables as environment variables. This setting is available at account, organization, and project levels.
To enable this setting, go to Account Settings > Account Resources > Default Settings > Pipeline, and then expand Pipeline. Next, set the Export Service Variables as Env Variables setting to true.
Once you enable this setting, a service's variables are available as Bash variables in any Shell Script step in a stage that deploys that service. You can access the service variables like you access any Bash variables. For example, the service variable, var1 is available for use in a Shell Script step as $var1.
When you add a service, you can select variables of type String, Secret, or Number.
Let's consider an example where you have added the following service variables:
| Variable name | Type | Value |
|---|---|---|
svar1 | String | normalValue |
svar2 | String | value-with-hyphen |
svar3 | String | value_with_underscores |
secretServiceVar | Secret | yourSecret |
nvar1 | Number | 1 |
svar4 | String | abc%def%123 |
svar5$abc | String | key_With_Dollar |
svar6 | String | abc,ghj,klk |
In your Shell Script step, you can use these service variables as environment variables if you had enabled the Export Service Variables as Env Variables setting.
Shell scripts executing on remote hosts cannot export the correct value if you're using special characters such as -, _, $, %, and spaces in Bash.
When you run the pipeline, you can see the value of the service variables passed as environment variables.

Tutorial - Add and reference variables in a CD pipeline
This tutorial demonstrates how to create and use variables in a Harness CD pipeline.
This tutorial builds upon the pipeline created in the Deploy using Kubernetes Manifest tutorial. If you want to follow along, make sure you have successfully deployed the Guestbook app from that tutorial before proceeding further.
Reference built-in variables
-
Log into app.harness.io, if you have not already done so.
-
Navigate to Deployments > Pipelines, and click into your
guestbook_canary_pipeline. -
Select Edit Pipeline from the top of the page to enter the Pipeline Studio.
-
Select the
deploy-guestbookstage, then select Execution. -
Select Add Step > Add Step.
-
Scroll to the Utilities section, then select Shell Script.
-
In the Name field, type
Successful Deployment Message. -
In the Script field, paste the following:
echo "<+pipeline.triggeredBy.name> successfully deployed <+service.name> to <+env.name>." -
Select Apply Changes, then Save.
-
Select Run and then Run Pipeline
-
Wait for the pipeline to complete, then select the Successful Deployment Message step.
-
Expand Step Details if needed, and verify the step log shows the script message with the variable names appropriately rendered.
Create an account-level variable
-
Navigate to Account Settings > Account Resources. Select Variables.
-
Select New Variable.
-
Name the variable
account_aliasand set its Fixed Value to your first name or nickname. -
Click Save.
Variables created at the account, org, or project level support fixed values only. Variables created at the entity level (such as pipelines, stages, and services), support dynamic runtime inputs and expressions.
-
Navigate to Deployments > Pipelines > guestbook_canary_pipeline. Select YAML > Edit YAML.
-
In the Successful Deployment Message step, on the script: line, replace
<+pipeline.triggeredBy.name>with<+variable.account.account_alias>. -
Select Save and then Run > Run Pipeline.
-
After the pipeline completes, verify that the step log message references the value you set for your account level variable.
Create a project entity-level variable as a runtime input
-
In Deployments > Pipelines, select your
guestbook_canary_pipeline. -
Select Edit Pipeline, then select Variables from the right sidebar.
-
Under Pipeline > Custom Variables, select Add Variable.
-
Name the variable region, leave the value blank, then select Set variable as required during runtime.
-
Select Save, then Apply Changes.
-
In the Pipeline Studio, select YAML.
-
At the bottom of the YAML, in the variables block, replace
value: ""withvalue: <+input>. -
In the Successful Deployment Message step, modify the script line to include the new variable:
echo "<+variable.account.account_alias> successfully deployed <+service.name> to <+env.name> in <+pipeline.variables.region>." -
Select Save.
-
Select Run. Note the prompt for a value for the region variable. Enter a value of your choosing (e.g. eu, india, usa, etc.).
-
Select Run Pipeline.
-
After the pipeline completes, verify that the step log message references the value you set for your account level variable.